
Elevate Your Bathroom: How to Install a Wall-Hung Toilet
The Modern Bathroom Revolution: Wall-Hung Toilets
Wall-hung toilet installation is a straightforward process that requires proper planning and careful execution. Here’s a quick overview for those wanting the essentials:
- Planning: Ensure wall structure can support 500+ lbs, measure for proper clearances (15″ from center)
- Framing: Use 2×6 studs (preferred) or 2×4 studs with proper reinforcement
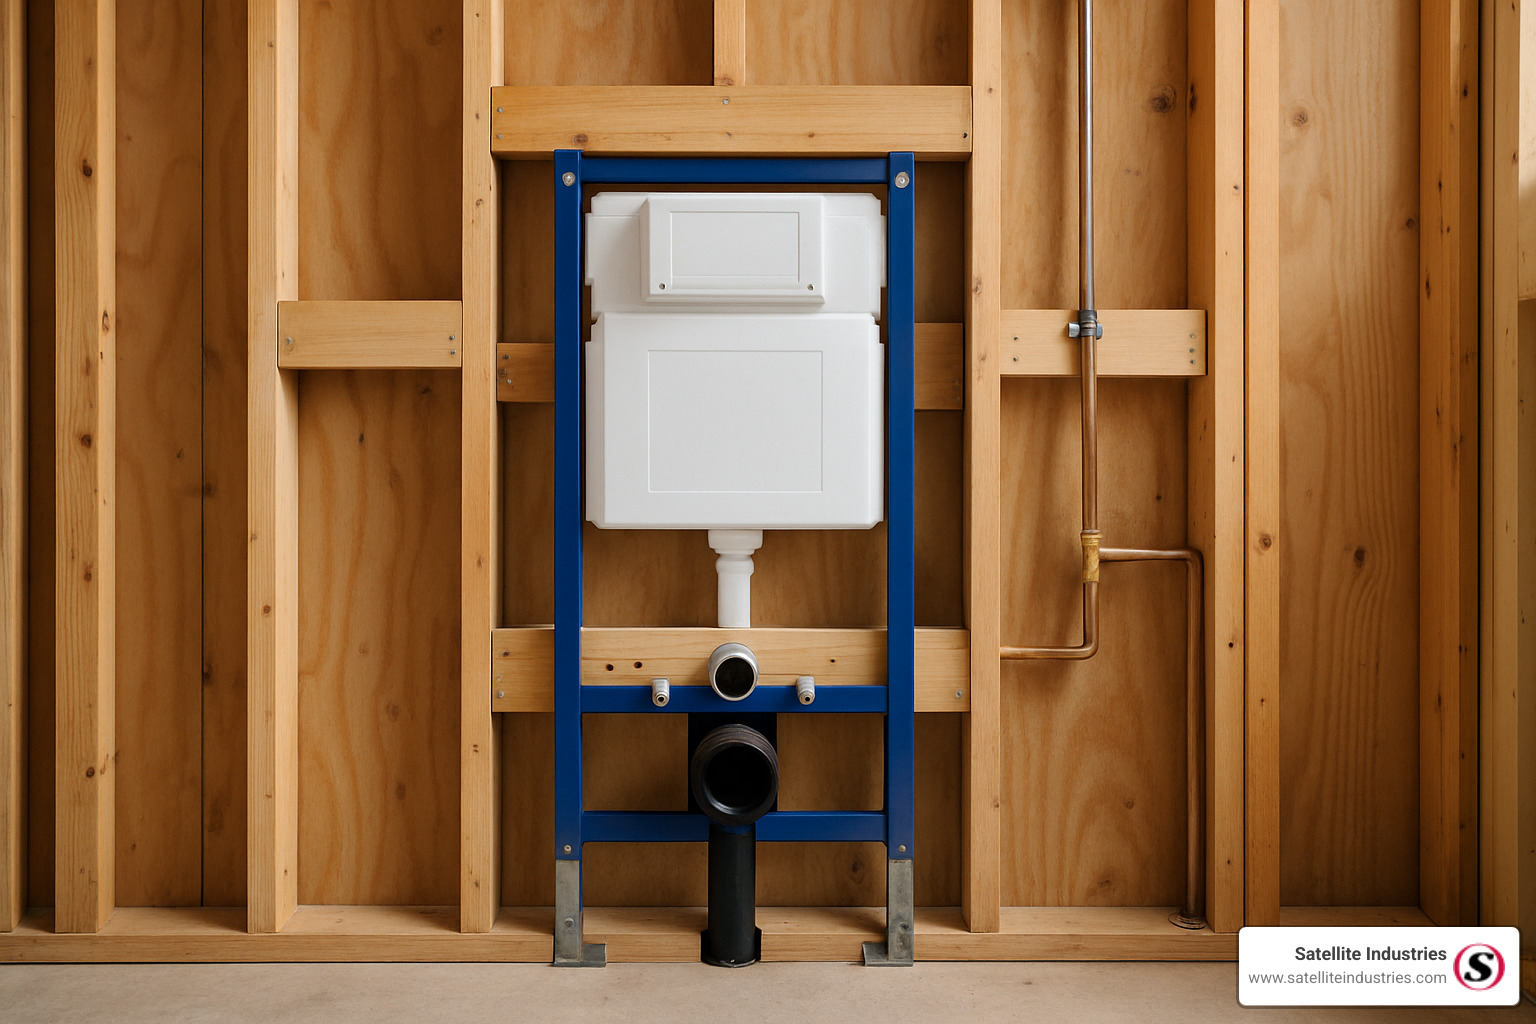
- Rough-in: Install in-wall carrier frame, connect water supply and waste lines
- Wall finishing: Complete drywall/tile around the carrier, leaving access for the mounting bolts
- Bowl mounting: Attach the bowl to the carrier, level, and secure with proper torque
- Finishing: Install flush actuator plate and toilet seat, test for leaks
Wall-hung toilets have become increasingly popular due to their sleek appearance, space-saving design, and ease of cleaning. Unlike traditional floor-mounted toilets, these modern fixtures mount directly to a carrier frame inside the wall, concealing the tank and creating a floating effect that can save 8-12 inches of floor space in your bathroom.
The appeal goes beyond aesthetics – wall-hung toilets offer practical benefits that make them worth considering for your next bathroom renovation. They allow for adjustable height installation, making them perfect for universal design and accessibility needs. The lack of a base also means no more cleaning around those difficult toilet edges, and the concealed tank typically offers water-saving dual-flush technology.
I’m Michelle Amelse, Vice President of Marketing and Customer Success at Satellite Industries, where my 26 years of experience in the sanitation industry has included overseeing countless wall-hung toilet installation projects and helping customers select the right equipment for their needs.

Planning Your Project
Planning is the foundation of a successful wall-hung toilet installation. I’ve seen many bathroom renovations over the years, and proper preparation makes all the difference between a smooth project and one filled with headaches.
Wall-hung toilets bring a touch of European elegance to any bathroom, but they do require thoughtful planning before you pick up any tools. Let’s walk through everything you need to consider.
Benefits of Wall-Hung Toilets
The floating design of wall-hung toilets isn’t just visually striking—it’s practical too. You’ll gain 8-12 inches of floor space compared to traditional toilets, making even the smallest bathroom feel more spacious. I love how this extra space creates a more open, airy feel.
One of my favorite features is the adjustable height. You can set the bowl anywhere from 15-19 inches off the floor during installation, perfect for accommodating family members of different heights or mobility needs. And cleaning? So much easier when there’s no base collecting dust and grime where it meets the floor.
The modern, sleek appearance instantly updates your bathroom’s look, while many models offer water-efficient dual-flush technology that’s good for both your water bill and the environment.
Drawbacks to Consider
Be prepared for a higher upfront investment. The in-wall carrier system and more complex installation typically cost more than traditional toilets. Your wall must be robust enough to support significant weight—at least 500 pounds, though most quality carriers are rated for 880+ pounds.
The installation process is more involved than with floor-mounted models, potentially requiring professional help. And should problems arise with components inside the wall, accessing them might require removing wall materials—something to keep in mind before you commit.
Code Compliance and Permits
Before you begin, check your local building codes and secure necessary permits:
- Most plumbing codes require at least 15 inches of clear space on either side from the center of the toilet
- Some areas require licensed plumbers for this type of installation
- Relocating a toilet often requires additional permits
- Verify local requirements for waste pipe venting specific to wall-hung toilets
Taking time to understand these requirements now prevents costly corrections later.
Wall Construction Requirements
The wall housing your toilet needs proper construction to support both the fixture and its users. While some carriers can fit in 2×4 walls, I strongly recommend 2×6 framing. The extra depth provides more room for plumbing adjustments and significantly stronger support.
Pay careful attention to stud spacing—most carrier frames require specific measurements, commonly 19¾ inches for many models. The wall framing must be reinforced to safely support both the toilet and the weight of users, typically 500+ pounds.

Tools and Materials Needed
You’ll need several tools for this project: tape measure, level, drill with appropriate bits, adjustable wrench, pipe cutter or hacksaw, Allen wrench set, torque wrench, screwdrivers, and a spirit level.
For materials, gather your wall-hung toilet bowl, in-wall carrier frame with tank, mounting hardware, 3″ waste pipe fittings, water supply line and fittings, silicone sealant, protective foam padding, nail plates to protect in-wall plumbing, and appropriate wall finishing materials.
Choosing the Right Carrier Frame for Wall-Hung Toilet Installation
The carrier frame is truly the backbone of your wall-hung toilet installation. This hidden component bears the entire weight of both toilet and user, making proper selection crucial for safety and longevity.
Standard in-wall carriers fit between wall studs and disappear once installation is complete. Pre-wall carriers can be installed against existing walls, creating a false wall to house the system. For tight spaces, corner carriers maximize available room.
When selecting a carrier, verify its weight rating (look for 880+ pounds), check stud spacing compatibility (typically 180mm or 230mm), and consider height adjustability options. Many quality carriers include acoustic padding to minimize noise from the tank filling—a thoughtful feature for middle-of-the-night bathroom visits.
Ensure your chosen carrier is compatible with your toilet bowl model. They’re not all universally compatible, and mismatched components lead to frustration and wasted time.
Codes, Permits & Bathroom Prep for Wall-Hung Toilet Installation
Local plumbing codes govern several aspects of your installation: waste line size (typically minimum 3″), venting requirements, water supply specifications, and required clearances (usually 15″ from centerline to adjacent fixtures).
If you’re retrofitting a wall-hung toilet where a floor-mounted model once stood, you’ll need to address the vent stack routing, waste pipe positioning, and water supply line relocation. These adjustments can be straightforward or complex, depending on your existing plumbing configuration.
For accessibility, wall-hung toilets offer excellent flexibility. ADA guidelines recommend toilet seat heights of 17-19 inches from the floor—easily achievable with adjustable wall-hung systems. Even if not immediately needed, consider installing blocking for future grab bars, providing adaptability as needs change.
Don’t overlook moisture protection. Install appropriate barriers behind cement board in wet areas, use waterproof membranes where required, and properly seal all wall penetrations to prevent moisture damage.
Finally, plan for inspections at the right stages: a rough-in inspection after the carrier installation but before closing walls, and a final inspection once everything is installed and functional. These inspections ensure your beautiful new toilet installation is not just attractive but safe and code-compliant.
Wall-Hung Toilet Installation: Preparation & Rough-In
Getting the prep work right is the foundation of a successful wall-hung toilet installation. Think of this phase as building the hidden framework that will silently support your beautiful floating toilet for years to come.
Framing the Wall
When it comes to the wall that will house your toilet, stronger is definitely better. I always recommend using 2×6 studs rather than 2x4s – they provide more stability and give you extra space for plumbing adjustments.
Your carrier frame will dictate your stud spacing – typically about 19¾ inches for most models. Don’t try to cut corners here! The wall needs to support not just the toilet but potentially 500+ pounds of human weight too.
For extra peace of mind, add sister studs (additional studs placed side-by-side with existing ones) and horizontal blocking where the carrier will mount. This creates a rock-solid foundation that won’t budge over time.
If you’re working around an existing vent stack, take a moment to plan your approach. You might need to position your toilet to one side or reroute the stack entirely – better to figure this out now than halfway through the project!
Preparing the Plumbing
For your waste pipe, you’ll need a standard 3″ line positioned at the exact height specified by your carrier manufacturer. This is critical – even being off by an inch can cause headaches later.
If you’re retrofitting, you’ll likely need to reconfigure the existing waste pipe. When running it through the bottom plate of your wall, remember to protect the pipe with nail plates – this prevents future damage from errant screws or nails.
The vent stack often presents the biggest challenge. If it conflicts with your carrier location, you have two options: shift the toilet position or reroute the vent using offset elbows. Just make sure all connections still meet local code requirements.
For the water supply, install an accessible shut-off valve (you’ll thank yourself later) and run either PEX or copper lines to your carrier. If you’re planning ahead for a fancy bidet seat or electronic features, consider adding a nearby electrical outlet – but consult an electrician first!
Rough-In Measurements & Stud Spacing
Precision matters enormously in a wall-hung toilet installation. As we say in the industry, “measure twice, cut once” – but for toilets, maybe measure three times!
Your carrier frame typically needs about 19¾ inches between studs. Building codes require 15 inches of clear space on either side from the center of the toilet – this ensures comfortable use for everyone.
One of the great advantages of wall-hung toilets is height customization. Standard height is 15-16 inches from floor to bowl rim, while comfort height (ADA compliant) is 17-19 inches. Choose what works best for your household.
A laser level is your best friend for ensuring perfect alignment. Create and mark a center line for the toilet on the floor as your primary reference point. When everything is perfectly square and level, you’ll avoid that slightly-crooked toilet that would drive you crazy for years.
If your existing studs don’t match the required spacing, you may need to reframe that section of wall. For load-bearing walls, please consult a structural engineer first – this isn’t a place to improvise!
Plumbing & Venting Adjustments Before Wall Board
Once everything’s framed, it’s time to connect and test all plumbing before sealing up the walls. Trust me, finding a leak after the drywall and tile are up is a nightmare you don’t want to experience.
If your waste pipe doesn’t align perfectly with the carrier (which happens often), use offset elbows to make the connection. Ensure all waste connections are properly secured – with glue for PVC/ABS pipes or appropriate fittings for cast iron.
For testing, cap waste lines with Fernco caps and pressure test everything. This is also when you’ll connect your water supply line – typically using a ½” NPT to PEX adaptor for the carrier.
Don’t forget to protect all in-wall plumbing with nail plates and secure pipes to prevent movement. Loose pipes can create annoying noises when water rushes through them.
Before closing up the walls, schedule your inspection! Local building departments typically require a “rough-in” inspection to verify that everything meets code. This step might seem like a hassle, but it ensures your installation is safe and sound for the long haul.
At Satellite Industries, we’ve seen countless bathroom installations, and proper preparation consistently makes the difference between a smooth project and a frustrating one. Take your time with this foundation work, and the rest of your wall-hung toilet installation will proceed much more smoothly.
Step-by-Step Wall-Hung Toilet Installation Guide
Now that your preparation and rough-in work is complete, let’s roll up our sleeves and tackle the actual wall-hung toilet installation. This is where all your careful planning starts to pay off, changing your bathroom into a modern, space-saving oasis.
Wall-Hung Toilet Installation: Mounting the In-Wall Tank & Carrier
Think of the carrier frame as the backbone of your entire installation. Getting this right means your toilet will remain rock-solid for years to come.
Start by positioning your carrier frame between those carefully prepared studs. Take your time adjusting the height—remember that most people prefer the top of the toilet bowl to sit between 15-19 inches from the finished floor. Those adjustable feet on the carrier are your best friends here, allowing you to fine-tune both the height and level.
Once you’ve got it perfectly positioned, mark your mounting points on both the floor and studs. You might need to drill some pilot holes, especially in harder materials. Then secure the carrier to the floor using the provided bolts or anchors, followed by attaching it firmly to the studs.
Don’t forget to use a torque wrench to tighten everything to the manufacturer’s specifications—typically around 30 ft-lbs. This isn’t the time to eyeball it or go with “tight enough”!
The acoustic padding is a small detail that makes a big difference. Place the foam padding between the tank and wall structure to minimize those annoying water-flow noises and prevent vibration damage. Your future self (and anyone sharing your bathroom) will thank you.
Finally, connect your water supply line to the fill valve on the carrier. A bit of thread tape or pipe compound on the connections goes a long way toward preventing leaks. Hand-tighten first, then give it a careful turn with a wrench—but resist the urge to muscle it too tight, which can damage the connections.

Wall-Hung Toilet Installation: Connecting Waste & Water Lines
With your carrier securely mounted, it’s time to make those crucial plumbing connections. For the waste pipe, ensure it’s cut to the perfect length for connecting to the carrier. If you’re working with PVC or ABS pipes, don’t skimp on the primer and cement—proper application ensures a leak-free connection. The waste pipe connects to the carrier outlet using the provided gasket or seal, forming a watertight connection that will handle everything your toilet sends its way.
For your water supply, PEX users will need a ½” NPT to PEX adaptor, while copper pipe installations require appropriate fittings and soldering. Whatever material you’re using, double-check that all connections are secure.
Before you close up that wall, perform a thorough test of your handiwork. Temporarily connect the water supply and run a flow test, checking for leaks and verifying that the tank fills and flushes as expected. Make sure the waste line is draining properly without any backup. This is your last easy chance to fix any issues, so take your time!
Once everything passes your inspection, you can close the wall with drywall or cement board. Cut precise openings for the mounting bolts and flush actuator—measure twice, cut once is the golden rule here. Then finish your wall with tile, paint, or whatever material matches your bathroom design. Just make sure those mounting bolts protrude far enough from the finished wall for the next steps.
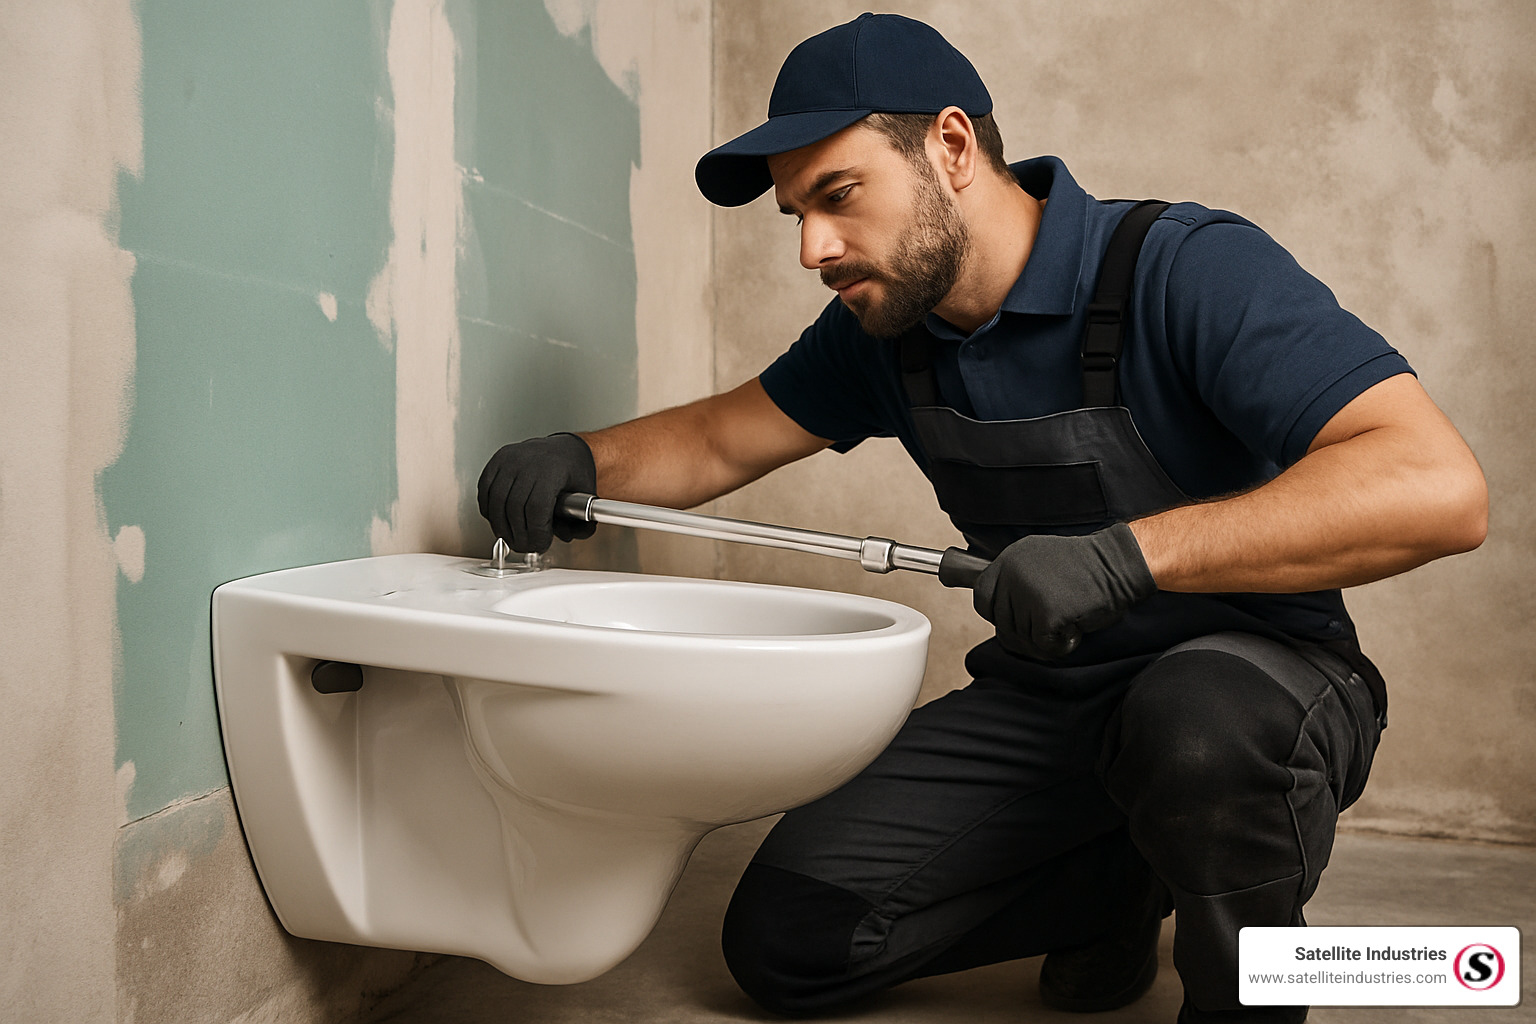
Setting & Securing the Toilet Bowl
Now comes the moment when your wall-hung toilet installation starts to take shape visually. First, check that your mounting bolts are secure and extending the correct distance from the wall. If they seem at all loose, add washers or nuts behind the wall to secure them properly.
Before mounting the bowl permanently, you’ll need to measure and cut the connection pipes. Slide the inlet pipe into the wall opening and mark where you’ll need to cut (this is distance A). Do the same for the outlet pipe (distance B). Remove the toilet, make your cuts, and file the edges smooth for a perfect fit.
When you’re ready to mount the bowl, apply a bit of lubricant to the gaskets if the manufacturer recommends it. Then, with a helper if possible, carefully slide the bowl onto those mounting studs, making sure the inlet and outlet pipes engage properly with their connections. Use a spirit level to confirm the bowl is perfectly level—a crooked toilet not only looks unprofessional but can also cause functional problems.
Secure the bowl by installing washers and nuts onto the mounting bolts. Tighten them gradually and alternately to maintain that perfect level. A torque wrench set to the manufacturer’s specifications (typically around 5 Nm) ensures you won’t over-tighten and risk cracking the porcelain—an expensive mistake!
Finally, apply a neat bead of silicone sealant around the perimeter where the toilet meets the wall. Smooth it with a wet finger for a professional finish, and allow it to cure completely according to the manufacturer’s instructions.

Installing Flush Actuator, Seat & Final Trim
You’re in the home stretch now! The flush actuator installation is relatively straightforward—follow your manufacturer’s instructions to connect the mechanism to the in-wall tank. For dual-flush systems, ensure both flush options are properly connected before securing the actuator plate to the wall. Test both flush options to make sure everything works as expected.
Installing the toilet seat is usually simple. Position it on the bowl, aligning the mounting holes, and insert the mounting bolts. Many modern seats feature quick-release hinges for easier cleaning—if yours has this feature, follow the specific instructions for the mechanism. Tighten the bolts securely but not excessively, and snap in those covering plugs for a cleaner look.
For the finishing touches, trim any excess length from the mounting studs and install the provided plastic caps over the nuts and bolt ends. If you’ve tiled around your actuator plate, ensure all edges are properly sealed with silicone to prevent moisture problems down the road.

For readers who want even more technical depth, download TOTO’s comprehensive wall-hung toilet installation manual here. You can also learn about the broader history and mechanics of modern toilets in this concise Wikipedia overview. These external resources complement the guidance above and provide additional reference points for a flawless installation.
Maintenance, Troubleshooting & Common Mistakes
Once you’ve completed your wall-hung toilet installation, proper maintenance will ensure it serves you beautifully for years to come. Let’s talk about keeping your floating throne in perfect working order and how to handle any issues that might pop up along the way.
Regular Maintenance
Your wall-hung toilet needs regular attention to stay in top shape. Every few months, take a moment to check for any moisture or water stains around the toilet – these are early warning signs of potential leaks. If you hear the sound of running water when nobody’s using the bathroom, your tank might be leaking internally.
The beauty of a wall-hung toilet is its clean, floating appearance, but this means the mounting bolts doing all the heavy lifting need periodic checking. Every couple of years, verify that these bolts remain tight. If you notice even slight movement in the toilet bowl, it’s time to grab your torque wrench and tighten those mounting nuts back to the manufacturer’s specifications.
When it comes to cleaning, gentleness is key. Those beautiful porcelain surfaces deserve mild, non-abrasive cleaners. If your toilet features special glazes like CEFIONTECT®, you’ll want to be particularly careful – avoid harsh chemicals, bleach, acids, alkalis, and definitely no steel wool. A soft cloth with mild soap or a gel-based cleaner with a soft plastic-bristled brush will do the trick without damaging the finish.
For the actuator plate (that stylish flush button on your wall), a simple wipe-down with a damp cloth and mild soap keeps it looking pristine. And while we’re talking about the tank – resist the temptation to drop those bleach tablets inside. They might seem convenient, but they can damage internal components and lead to costly repairs.
Common Issues and Solutions
Even the best wall-hung toilet installation might encounter a hiccup or two over time. Let’s troubleshoot some common issues:
If you’re experiencing a weak flush, several culprits might be to blame. Check your water supply pressure first – it might be too low to provide adequate flushing power. A partially clogged trapway could also be restricting water flow, or perhaps the flush mechanism simply needs adjustment. Most manufacturer instructions include details on how to fine-tune the flush for optimal performance.
When you notice water seeping where the toilet meets the wall, act quickly. This usually indicates a failed seal, loose connections, or in rare cases, cracked porcelain. Carefully check and tighten the mounting bolts (remember not to overtighten!), and inspect the seals for damage or wear. Catching these issues early prevents water damage to your beautiful bathroom walls.
A rocking bowl feels unstable and can lead to leaks. This is almost always due to loose mounting bolts or improper installation. The solution is straightforward – tighten those bolts to the specified torque, and if that doesn’t solve it, you might need to check if the carrier was properly installed initially.
The sound of running water when no one’s using the toilet typically points to a faulty fill valve or misaligned flapper/seal. You can access these components through the actuator plate or access panel (if you wisely installed one). A simple adjustment or replacement part usually solves the problem.
Clogs happen to the best of us. For wall-hung toilets, use a toilet auger specifically designed for these models, as standard augers might damage the bowl. If clogs are recurring, check the water level in the tank – insufficient water flow can lead to incomplete flushing.
Common Installation Mistakes to Avoid
Looking back at the installation process, there are several pitfalls that even experienced DIYers sometimes encounter. Learning from others’ mistakes can save you significant headaches.
Inadequate wall reinforcement is perhaps the most serious mistake. Your wall-hung toilet needs proper support – always use appropriate framing techniques and add blocking where needed. If you’re working with 2×4 walls, consider additional reinforcement or upgrading to 2×6 framing for better stability and peace of mind.
Taking time to ensure proper carrier alignment is crucial. The carrier must be perfectly level and at the correct height – even small misalignments can lead to leaks or an unstable toilet. This is one area where precision pays off tremendously.
One of the biggest regrets among DIYers is not testing thoroughly before closing up walls. Always pressure-test water lines and verify waste connections are secure before finishing the wall. Trust me, fixing leaks after the wall is complete is much more difficult and expensive – I’ve seen this mistake cause major headaches for customers.
When it comes to porcelain fixtures, gentle handling is essential. Over-tightening bolts is a common error that can crack the porcelain, turning your beautiful new toilet into a costly replacement project. Always use a torque wrench and follow manufacturer specifications to avoid this heartbreaking mistake.
Precise measurements make all the difference when cutting inlet and outlet pipes. Take your time with this step, and always deburr and bevel pipe edges to prevent damage to seals. A little extra care here prevents leaks down the road.
Finally, think about future maintenance needs. Installing an access panel is always a wise choice, but at minimum, ensure the actuator plate can be removed for basic access to internal components. Your future self will thank you when routine maintenance becomes a simple job rather than a major project.
Frequently Asked Questions About Wall-Hung Toilet Installation
Thinking about taking the plunge with a wall-hung toilet installation? You’re not alone! I’ve gathered the most common questions homeowners ask before starting on this modern bathroom upgrade.
What are the main pros & cons?
The floating design of wall-hung toilets offers some impressive advantages. Space-saving benefits are perhaps the most noticeable – you’ll reclaim 8-12 inches of precious floor space compared to traditional models, making even the smallest bathrooms feel more spacious.
Cleaning becomes remarkably easier without that troublesome base collecting dust and grime. Just imagine being able to mop right under your toilet without awkward contortions! The adjustable height feature is another game-changer, allowing you to position the bowl at your ideal comfort level whether that’s standard height or ADA-compliant.
From a design perspective, the sleek, modern appearance creates an instant upgrade to any bathroom. Many homeowners also appreciate the water efficiency of dual-flush systems that come standard with many wall-hung models.
Of course, there are trade-offs to consider. The upfront cost is higher than traditional toilets when you factor in the carrier system. The installation process is more complex, often requiring professional help. If something goes wrong inside the tank, accessing components for repairs can be challenging without proper planning. And don’t forget that your walls need proper reinforcement to safely support both the toilet and whoever uses it!
Can I retrofit one into a 2×4 wall?
Yes, you can install a wall-hung toilet in a 2×4 wall, but proceed with caution. Some carrier systems are specifically designed for narrower walls, but your options will be more limited.
Working within a 2×4 wall means less space for plumbing adjustments, which can make installation trickier, especially if you need to work around existing pipes. You’ll likely need to add extra reinforcement to ensure the wall can adequately support the toilet system.
Many homeowners opt for a pre-wall installation in this scenario, where the carrier mounts against your existing wall with a new false wall built in front. This creates the space needed without major structural changes.
If possible, reframing with 2×6 studs is truly the preferable option – it provides more room to work, better support, and greater flexibility in positioning your plumbing connections. The extra two inches makes a world of difference in the ease of installation.
When should I hire a professional installer?
While DIY enthusiasm is admirable, wall-hung toilet installation isn’t always the best project to tackle yourself. Consider calling in a pro if you’re uncertain about your plumbing or framing skills. Moving waste lines or vent stacks definitely calls for experienced hands, and many local building codes actually require licensed professionals for this type of work.
Unusual wall construction, tight spaces, or modifications to load-bearing walls are all red flags that signal “professional required.” Even if you’re generally handy, the structural aspects of ensuring your wall can safely support hundreds of pounds is not something to experiment with.
I’ve seen many experienced DIYers take a hybrid approach – hiring professionals for the critical rough-in plumbing and carrier mounting, then handling the final bowl installation themselves once the infrastructure is properly in place. This can be a smart compromise that saves money while ensuring the most technical aspects are done correctly.
How long does a wall-hung toilet installation take?
For DIYers with basic skills, expect to spend 4-6 hours on the installation, typically spread across a couple of days. Professional plumbers can usually complete the rough-in work in 2-4 hours, with another 1-2 hours for the finishing work.
Remember to factor in additional time for wall finishing, tiling, and drying time between stages. Rushing these steps can lead to problems down the road, so patience pays off!
What is the weight capacity of a wall-hung toilet?
You might be surprised by how sturdy these floating fixtures really are! Quality wall-hung toilet carriers typically support at least 500 pounds, with many rated for an impressive 880+ pounds when properly installed. Always check the manufacturer’s specifications for your specific model and ensure proper installation techniques are followed to maintain this capacity.
How do I access the tank if there’s a problem?
This is where a bit of foresight during installation really pays off. For minor adjustments, you can often access components through the actuator plate. More significant issues may require access through a dedicated panel if you had the foresight to install one during construction.
Without an access panel, you might need to open the wall itself, which means repair work afterward. This is precisely why many experienced installers recommend creating a removable access panel during the initial installation. These can be discreetly placed in less visible locations like adjacent closets or cabinets, giving you peace of mind that future maintenance won’t require demolition.
At Satellite Industries, our engineering team has seen countless installations, and we always emphasize the importance of planning for future access – it’s a small step during installation that can save significant headaches down the road.
Conclusion
Wall-hung toilet installation transforms any bathroom into a modern, sleek space that feels more spacious and sophisticated. Beyond just looking good, these floating fixtures deliver real practical benefits that you’ll appreciate every day – from easier floor cleaning to customizable height options that work for everyone in your household.
I’ve guided many customers through this process, and while it’s definitely more involved than setting up a standard toilet, the results are absolutely worth the extra effort. The satisfaction of completing a successful installation comes from careful attention to the details that matter most.
Remember these key points for success:
First, don’t skimp on preparation. Make sure your wall structure can handle the weight (at least 500 pounds), get all necessary permits, and carefully plan both water and waste connections before you begin. This upfront planning prevents headaches later.
Second, invest in quality components. A robust carrier system and well-made bowl will serve you reliably for years, while cheaper alternatives might lead to frustrating issues down the road.
Third, always test thoroughly before closing up your walls. This simple step can save you from having to tear into finished walls later – something nobody wants to experience!
Fourth, take your time with measurements and alignment. A perfectly level, secure installation ensures your toilet functions properly and stays firmly in place for years of use.
Finally, don’t forget about maintenance. Regular checks for leaks, loose bolts, and proper function will extend the life of your installation and prevent unexpected problems.
At Satellite Industries, our engineering team applies the same principles of durability and thoughtful design to all our sanitation products that you should look for in your wall-hung toilet components. While we focus on providing high-quality portable sanitation equipment to distributors worldwide rather than residential fixtures, we understand what makes sanitation solutions work reliably in challenging environments.
Your new wall-hung toilet will not only make your bathroom look more spacious and contemporary but will also provide practical benefits you’ll appreciate daily. The initial investment in proper installation pays dividends through years of trouble-free use, easier cleaning, and the satisfaction of having a bathroom that feels thoughtfully designed.
Enjoy your liftd bathroom experience – both literally and figuratively – with a properly installed wall-hung toilet that perfectly balances style and functionality.
Latest from the Satellite Industries Blog
Need Help {Finding the Right Sanitation Solution?}
Satellite Industries is the largest manufacturer of portable restrooms, restroom trailers, restroom trucks, septic trucks, slide-ins, unit haulers, vacuum technology, modular solutions, consumables and deodorizers.
.webp)
.webp)